Wednesday 30 January 2008 — This is 18 years old. Be careful.
I needed a transparent PNG image of some text to overlay text on an image. My first try looked OK, but the edges of the text seemed to be the wrong color. After some finagling, I came up with PIL code that did the right thing.
Here was the first code I used:
import Image, ImageFont, ImageDraw

fontfile = r"C:\WINDOWS\Fonts\arialbd.ttf"

words = [
    ((10, 10), "Red", "#ff0000", 30),
    ((10, 50), "Green", "#00ff00", 30),
    ((10, 90), "Blue", "#0000ff", 30),
    ((10, 130), "White", "#ffffff", 30),
    ((10, 170), "Black", "#000000", 30),
    ]

# A fully transparent image to work on.
im = Image.new("RGBA", (120, 210), (0,0,0,0))
dr = ImageDraw.Draw(im)

for pos, text, color, size in words:

    font = ImageFont.truetype(fontfile, size)
    dr.text(pos, text, font=font, fill=color)

im.save("badtranstext.png", "PNG")
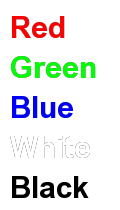
Here’s the image it produces: (If you are viewing this in IE6, you won’t see the transparency)


You can see that the edges of the letters are grimy. The white text should not be visible at all against the white background, but you can see the edges.
This is because when PIL draws a partially-transparent pixel at the edge of a letter, it uses the partial coverage of the shape to blend the background and foreground pixels. If the background were fully opaque, this would be the right thing to do, but with a fully transparent background like we are using, this gives the wrong color. We specified the background as fully transparent black, so for a pixel half-covered with white, PIL computes a color of half-transparent gray. It should be half-transparent white, so that the final image will be able to blend properly with any color underneath it.
Look at it another way: if I specify the background as completely transparent (alpha of 0), then it shouldn’t matter what color I provide for the RGB channels. I should get the same final result if I specify (0,0,0,0) or (255,255,255,0): the background is completely transparent, it has no color at all, those values are merely placeholders. But PIL will use the color channels to assign color to the edges of the type, so the placeholder “background color” will bleed into the result.
To get the proper result, I draw each string onto a separate gray channel, then add those gray pixels into an accumulated alpha channel. Then I use the gray text to compute full-color pixels for any pixels with even a slight trace of the text on it. When combined, the alpha channel will dilute down the color of the edge pixels down to give the proper appearance.
import Image, ImageFont, ImageDraw, ImageChops

fontfile = r"C:\WINDOWS\Fonts\arialbd.ttf"

words = [
    ((10, 10), "Red", "#ff0000", 30),
    ((10, 50), "Green", "#00ff00", 30),
    ((10, 90), "Blue", "#0000ff", 30),
    ((10, 130), "White", "#ffffff", 30),
    ((10, 170), "Black", "#000000", 30),
    ]

# A fully transparent image to work on, and a separate alpha channel.
im = Image.new("RGB", (120, 210), (0,0,0))
alpha = Image.new("L", im.size, "black")

for pos, text, color, size in words:

    # Make a grayscale image of the font, white on black.
    imtext = Image.new("L", im.size, 0)
    drtext = ImageDraw.Draw(imtext)
    font = ImageFont.truetype(fontfile, size)
    drtext.text(pos, text, font=font, fill="white")

    # Add the white text to our collected alpha channel. Gray pixels around
    # the edge of the text will eventually become partially transparent
    # pixels in the alpha channel.
    alpha = ImageChops.lighter(alpha, imtext)

    # Make a solid color, and add it to the color layer on every pixel
    # that has even a little bit of alpha showing.
    solidcolor = Image.new("RGBA", im.size, color)
    immask = Image.eval(imtext, lambda p: 255 * (int(p != 0)))
    im = Image.composite(solidcolor, im, immask)

# These two save()s are just to get demo images of the process.
im.save("transcolor.png", "PNG")
alpha.save("transalpha.png", "PNG")

# Add the alpha channel to the image, and save it out.
im.putalpha(alpha)
im.save("transtext.png", "PNG")
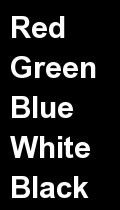
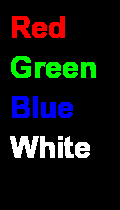
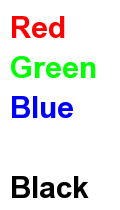
This is more work, but gives the correct results. Here’s the alpha channel, the color channels, and the final result:


And the result on various backgrounds:


Comments
Assuming that works, if you need to combine multiple text colours in a single image, you only need a rectangle of the appropriate colour for each word.
from pyglet import window, font, image
from pyglet.gl import *
win = window.Window()
ft = font.load('Arial', 36)
text = font.Text(ft, 'Hello World!', color=(1,0,0,1), y=-ft.descent)
glClearColor(0,0,0,0)
win.set_size(400,300)
win.dispatch_events()
win.clear()
text.draw()
win.flip()
image.get_buffer_manager().get_color_buffer().save('some-image.png')
You can fix that by unpremultiplying the image before saving. It's possible that there's an Image mode or save option to do that for you, but you can do it manually by replacing each pixel (R, G, B, A) with (R/A, G/A, B/A, A) wherever A is nonzero. For an 8-bit/channel image, remember to multiply by 255: R = int(round(255.0 * R / A)).
No, it doesn't. PIL's RGBA mode is not pre-multiplied. The problem is, as Ned mentions, that PIL's default compositing rules doesn't do the right thing if you're compositing RGBA on top of RGBA.
(there are slightly more efficient ways to work around this, but it's really something that should be fixed in the library...)
Next stop: sub-pixel anti-aliased text :)
cfg=Config(sample_buffers=1, samples=4)
Then change the window creation to include parameter
win=Window(config=cfg)
(remove the '.'s -- needed since this comment engine has no preformatted mode)
from pyglet import window, font, image, clock
from pyglet.gl import *
from pyglet.window import key
def on_key_press(symbol, modifiers):
.. if symbol == key.SPACE:
.... print 'saving color buffer to disk'
.... image.get_buffer_manager().get_color_buffer().save('some-image.png')
screen = window.get_platform().get_default_display().get_default_screen()
template = Config(double_buffer=True, sample_buffers=1, samples=4)
try:
.. config = screen.get_best_config(template)
except window.NoSuchConfigException:
.. template = Config()
.. config = screen.get_best_config(template)
import pprint
pprint.pprint(config)
context = config.create_context(None)
win = window.Window(context=context)
glClearColor(0,0,0,0)
ft = font.load('Arial', 36)
text = font.Text(ft, 'Hello World!', color=(1,0,0,1), y=-ft.descent)
win.set_size(400,300)
win.push_handlers(on_key_press)
clock.set_fps_limit(5)
while not win.has_exit:
.. win.dispatch_events()
.. clock.tick()
.. win.clear()
.. text.draw()
.. win.flip()
I can't tell from a quick perusal of the PIL documentation if it supports PNG8, or not.
I am having an infuriating time dealing with compositing RGBA+RGBA. Following something like what you have above I am able to do it when ...
1 - The background is completely solid, OR
2 - The background is completely transparent;
... Otherwise it muffs it up badly. Whether or not PIL has its own "special way" of dealing with this problem, or PIL is simply broken I am still not sure.
At this point I would hate to throw away what amounts to a couple dozen hours trying to get this to work, but let's not mince words -- if I had written it in ImageMagick it'd have worked right the first time. I'm trying to avoid using that because I need to deploy with a lot of developers with buildout and don't want a dependency hell any worse than it already is. Very frustrating.
It is absolutely related to problems with premultiplied alpha -- sorry Fredrik. It seems that the alpha channel on the first layer is to blame.
The solution to the problem is actually straightforward in words:
* Don't create an empty layer as suggested here.
* Start with the first layer of solid color.
* Apply your alpha-transparency to the solid color layer.
* After you apply the alpha-channel, use an algorithm to REMOVE the pre-multiplied alpha from the first layer:
channel = (channel * alpha + matte_color[channel_name]) // 255
That is, you need to loop over the (r,g,b) channels. matte_color is vital to getting this right; it is the color to which you are colorizing this layer. Make sure you use the correct "channel" of the matte_color (e.g. if channel == red, then make sure you're using the "red" channel of the matte_color, too).
* Now composite each subsequent alpha-transparent layer on top of the first one.
* finally, re-apply pre-multiplied alpha to the end result immediately before saving:
if a > 0: channel = (channel * (255 + a) // 2) // a
Result: No weird color halos caused by the first layer. If you think it was bad on text, you should have seen how awful it looked on my gradient test cases.
Hope this helps save someone a lot of frustration.
Tried variants of these kind of arguments with various ImageChops, but this is the only way I can get a bunch of semi-transparent images from png to merge together successfully.
Apologies for function/variable naming. Artist code.
Ended up using formula from http://en.wikipedia.org/wiki/Alpha_compositing
def Ljo_Composite(img0,img1):
nArr = list(img0.getdata())
nArr = list(img1.getdata())
for ind in range(min(len(inArr),len(nArr))):
Aa=nArr[ind][3]/255.0
if(Aa != 0):
val=list(nArr[ind])
Ca=[nArr[ind][0]/255.0,nArr[ind][1]/255.0,nArr[ind][2]/255.0]
Cb=[inArr[ind][0]/255.0,inArr[ind][1]/255.0,inArr[ind][2]/255.0]
Ab=inArr[ind][3]/255.0
a=1-(1-Aa)*(1-Ab)
for j in range(3):
val[j]=(Ca[j]*Aa + (Cb[j] - Ca[j]*Aa) * Ab)/a
val[j]=int(val[j]*255)
val[3]=int(a*255)
inArr[ind]=tuple(val)
img0.putdata(inArr)
return img0
Add a comment: